
[DISCLAIMER: we are not veterinarian professionals, we are only sharing our story and experiences. Seek professional advice prior to purchasing/treating animals]

Growing up on a cattle farm, my husband had seen his share of bottle calves. Sometimes the mother would have lactation issues, die after birth, or reject the calf. So they would bring the calf in and raise it until it was large enough to run with the rest of the herd. I, on the other hand, had never been around a bottle calf let alone RAISE one.
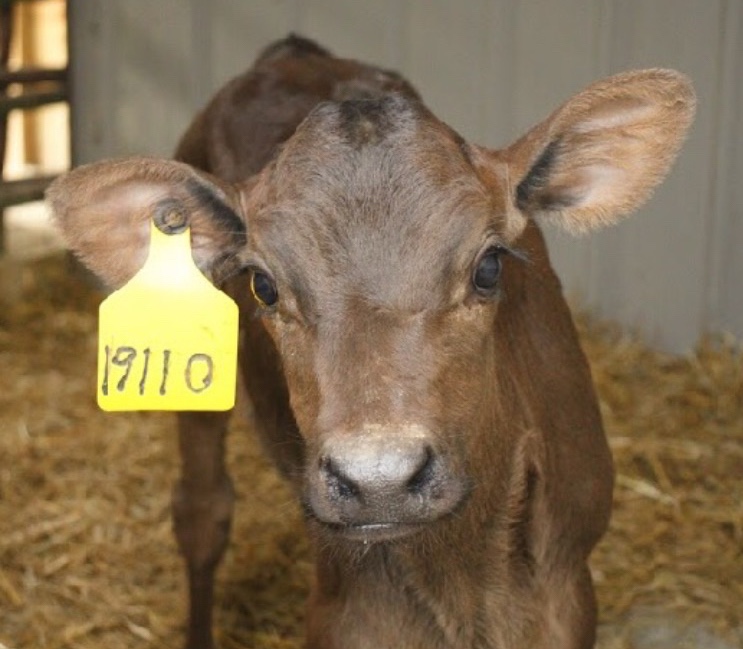
So if you read my previous post, “WE GOT GOATS!”, you would know we recently started our little herd of goats. We had been looking to add a few cows to the herd, but hadn’t found a decent price on anything yet. There’s this little livestock auction we attend every couple of months. You can find rabbits, chickens, hamsters, pigs, cows…pretty much any animal you could want there. We went just to have something to do that day, but they had great prices and A LOT of bottle calves! Quite a few ran out, but one, one in particular was a keeper. So, of course we bought her! And that is where our story begins.
Molly Moo Cow was an adventure for sure. We brought her home in a dog box (used for raccoon hunting). She had some little scrapes from being run around all day at the auction. She also had scours, which is pretty common in calves -especially bottle calves. So needless to say, our hands were kind of full. This brings me to my first bottle calf tip, which SHOULD apply to any new animals/livestock you bring home.
TIP #1-ALWAYS QUARANTINE NEW ANIMALS MINIMUM 72 HOURS PRIOR TO INTRODUCING THEM TO THE HERD!
Why do this? Even when buying from a certified breeder with the cleanest, nicest facilities, there is always a possibility that the animal could have diseases and parasites that can transfer to the rest of your herd. Most major diseases can be seen within the first 48 hours, we try to keep them separate for 2 weeks as some issues may surface later. Thus far, the only illnesses we have dealt with is coccidiosis (in goats) and scours. Scours is gross. For anyone who has children, you would understand this…scours is like when your kid craps and it goes out of the diaper, up its back, down its legs, and on to anything remotely close. It stains, it smells, it’s hard to clean…it’s just gross. Anyways, that brings me to my next tip.
TIP #2-SCOURS IS SCARY BUT MOSTLY TREATABLE
Scours is the most common reason for death in newborn calves. I have a link listed at the bottom of this post that will explain the causes a little more in depth. The jest of it is, there are several pathogens that a cow can contract and young cows, usually 1-30 days old, are extremely susceptible to them. They basically break down the lining in the intestines causing terrible diarrhea, loss of nutrients, dehydration, listlessness, loss of appetite, and death. The treatment options are fairly limited, but are often common. Young calves are easily taxed and can wear down quickly, so fast action is key.
With our first calf, I panicked a little when she started in with scours. As I said earlier, my husband has dealt with it time and again so he was fairly prepared. First thing to do is get the calf cleaned up and get them in a clean, dry environment. Any sort of wet, excessively cold or excessively hot environment will prolong the effects of scours and lessen the chance of survival. Next step is to keep on top of nutrients. Stick with regular bottle feedings and be careful not to overfeed as this can worsen the diarrhea.
TIP #3 DON’T OVERFEED THE CALF
Again, calves are very susceptible to any illness and overfeeding can cause diarrhea which is sometimes mistaken for scours-but usually results in a darker colored poo versus the bright yellow poo present in a calf with scours. There are a few medications you can administer to help curb the effects and get the calf back on its feet. Contact your local vet for a prescription or recommendations on what would be best for your calf. Some situations are much more dire than others and could require immediate medical attention and IV’s of medication instead of a pill form. We used calf scour boluses from our local Tractor Supply and it worked wonders! We gave 1/2 a bolus every 12 hours after the calf finished its bottle and did this for 4 days straight. The scours pretty much cleared up from there. We had a couple small bouts through out the first 30 days however the bolus would get it cleared up within a couple days.
TIP #4 MAKE SURE THEY GET PLENTY OF EXERCISE
So often times, bottle calves are kept in small pens by themselves or in a small lot with 10+ calves. This can lead to poor respiratory functions and lowered muscle development. A growing animal of any kind needs plenty of room to roam and fresh air! We keep each calf in a 10×10 stall, which is enough room for it to move around and play. The stall is also well ventilated so they constantly have fresh air. On top of having a larger stall, we allow the calves 30 minutes to an hour of play outside, either on a lead line or freely in the pasture. Once they are old enough and strong enough-usually 45-60 days- we turn them out in the pasture with our larger livestock for longer periods of time. This brings me to tip 4…
TIP #5 MONITOR ANIMALS WHEN INTRODUCING CALVES TO THE HERD
When leaving the calf with larger livestock, I suggest walking them around on a lead line for the first couple of days to let the animals get to know each other and see any negative reactions. For instance, our donkey likes to chase newer animals, and sometimes will bite! Obviously animals will do what they do, but sometimes things can get out of hand and your calf can end up seriously hurt leaving you with more problems!
TIP #6 INTRODUCE GRAIN AND HAY EARLY
Starting day 1 of calf ownership, we add a small hay net full of hay to the stall (tied safely, up off the ground out of the calves way of getting tangled up). Hay nets work best because the calf won’t lay on it and mess in it. I will share a post showing how to properly tie and use a hay net if you aren’t sure you’re doing it right! We start leaving a free choice pail of grain in the cow’s stall around the 4 week old mark. After each bottle we pop a small handful of grain in the cow’s mouth so they can get a taste for it. We didn’t notice our first cow actually eating any grain until the 50-60 day old mark. Still, it was not in large quantities, maybe a handful or two a day. Once you begin the weaning process (around 60 day), the cow should naturally start turning to hay and grain for more nutrients.
TIP #7 HALTER BREAK EARLY
Ever heard of a bull in a China shop? Raising a bottle calf brings so much meaning to this saying. Like anything, it is difficult to reprimand a baby animal and let them push you around. BUT bottle calves grow and get strong pretty fast and if you aren’t working with them on boundaries and correct leading habits, you’ll find yourself getting ran over pretty quickly! We keep a leather collar on the calf from day one. Having a collar gives you a quick “handle” to grab if the calf gets a bit rowdy and it is still safe for leading and training them. You can introduce a halter at any time to get the animal used to having a band around their nose however I don’t suggest leading or training the animal with a halter until the 60+ day mark. This gives their sensitive neck muscles time to develop. If the cow balks or runs off with a halter at too young of an age, it can cause damage to the neck muscles and potentially make the calf sour to being haltered and lead.
TIP #8 WEANING
We have a tendency to bottle feed a little too long. Typically you will feed 0-60 days. We don’t start weaning until after the 65-70 day mark. Nothing wrong with that-just means we are spending more money on milk replacer. I have heard of some farmers just cutting the calf off cold turkey, but we actually WEAN our calves. We start by decreasing the amount of milk replacer used in each bottle. So they still get 2 quarts twice a day, but less nutrients per bottle. Typically this process will span over 2 weeks at most, cutting the replacer until it is only a bottle of water. Why do this? It allows the calf to adjust to eating more grain and hay for nutrients instead of relying on the bottle. Once the mixture is mostly water you can stop bottle feeding altogether. We still feed the calf at the same time each day with a small portion of grain until they are comfortable eating with the rest of the herd.
That’s all I have for now! I have learned a lot with our first two calves and I certainly have a long way to go. I hope you found a little comfort and insight in this post, which I will try to update it as we go. If you have any questions feel free to leave a comment and I will give you my best opinion!! Also if you have any tips of your own feel free to share!
– Kristen

“I sought the LORD, and He heard me, And delivered me from all my fears.” Psalms 34:4
[DISCLAIMER: we are not veterinarian professionals, we are only sharing our story and experiences. Seek professional advice prior to purchasing/treating animals]


Leave a Reply